Hard to believe it's only April 2nd - feels like spring has been around for weeks. The weather is absolutely beautiful and I am so thankful winter is far behind us - I am not a cold weather person in the least - and I absolutely hate the snow. :( Anyways, with the welcoming of spring comes wedding season and this past week has been quite busy on my end with planning a wedding shower. Here are a few personalized (and EASY) touches to add to your event.
If you enjoy making your own invitations, these are the perfect invites for adding your special touch... and the best part of all was finding them on clearance! I have to admit, though, it did take me about an hour to get the formatting and fonts just right, but thankfully I copied off a few extra copies of the practice sheet that was included so I could make mistakes without wasting my originals. When you're on a tight budget, it's best to keep practicing until you get it just right. My advice: make a few demos, lay them aside for a few days, ask a few friends, co-workers, etc. about which ones they like and then make a decision. Looking back, I think I would have done a few things differently, but the guests really liked these, so it all works out! :)
Although I couldn't find the exact ones on the website, here is the link for other fun
invites.
And, here are a few pins on
pinterest for other designs and formats...
And of course, a
website for downloading fonts. :)
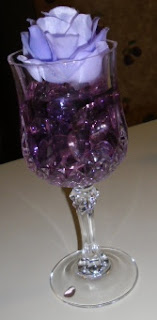
When brainstorming for centerpiece ideas, and keeping my tight budget in mind, I simply used what I already had. And when I mean "simply," I mean it was super, super simple. As an avid
Pinterest fan, I am always looking for new, fun, simple ideas, so I decided to combine quite a few creations into one. After 52 re-pins later, I would say it was quite a success...;) For trying this on your own, take any size champaign glass (they even have some at the dollar store!!!!), place plant jewels at the bottom, then fill with water and add your choice of food coloring. Place the flower on top, and you got it! Please be aware, however, that the plant jewels MUST be placed in first to keep from breaking not only the jewels, but the glass. Also, if you chose anything else to be placed at the bottom, please note that if it's not heavy enough, it will float to the top. And as always, when using food coloring, it's best to try out the different colors prior to the finished product so you know exactly what to add when it's time to create. Sometimes finding the right color takes a while and it can be quite a headache taking everything out of the glass and placing it back in over and over again. Don't be afraid to write down the "formula" for safe keepings until the big day - that's not cheating and it will save you sooo much time, headache and materials!!! Also, the sky is the limit, add what you want and make it your own and when you do, let me know, I love seeing what you make!!!
And as always, for scheduling your next event, please contact me at contactyourstrulyevents@yahoo.com and be sure to stop by next Monday for Bridal Shower : Part 2. Happy Easter, everyone!


